You work hard to create the products and services you sell. So it’s disappointing when someone wants their money back. Sometimes, it has nothing to do with the quality of the item you sold them. Maybe you sent the wrong size or color, or someone paid for a service upfront and decided to cancel it. Customers change their minds sometimes, too.
If you don’t have a firm return policy—and we hope that you do—you may have to give them their money back. QuickBooks provides the tools you need to issue credit memos and refunds. Let’s take a look at how this works.
Dealing with customer credits
You can’t just write checks to customers to give them refunds. You need to do the required bookkeeping in QuickBooks, so there’s a record of the activity. You’ll have three ways to deal with the credit:
- Retain the funds in the customer’s account as an available credit
- Issue a refund via check, credit card, or cash, depending on how the purchase was originally paid for
- Apply the amount to one of the customer’s open invoices
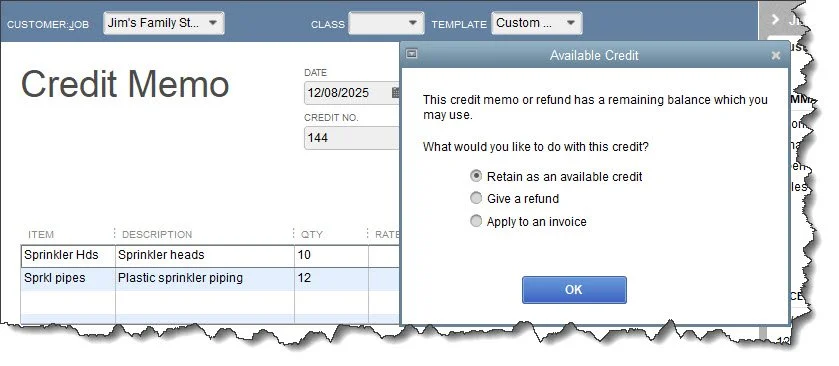
To issue a credit memo, click the Refunds & Credits icon on the homepage, or open the Customers menu and click Create Credit Memos/Refunds to open the Credit Memo window. Select the Customer/Job and change the Class and/or Template if desired. Select the Item(s) that the customer is returning and enter a Qty (quantity). When you’re done entering Items, click Save & Close to open the Available Credit window (pictured above). You’ll see your three options displayed there.
Keep It As a Credit
Retain as an available credit is selected by default. Leave it selected and click OK to return to the homepage. If you want to see how the credit is applied, go to the Customer Center by opening the Customers menu and clicking Customer Center. There are two ways to see the credit. Scroll down to the customer’s name under the Customers & Jobs tab and click it or click the Transactions tab and then Credit Memos.
Give the Customer a Refund
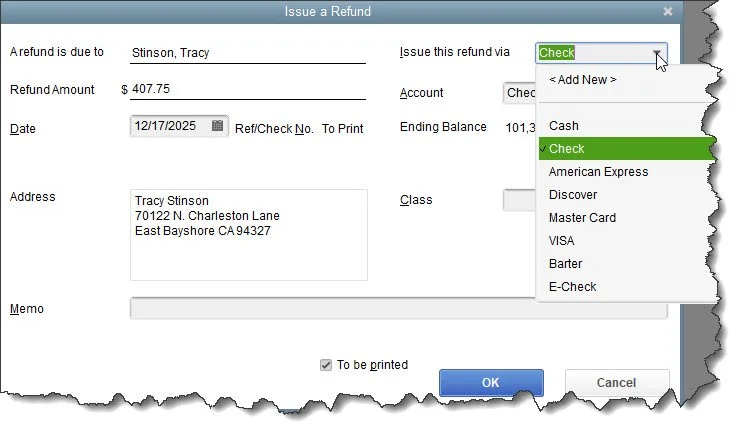
If you choose Give a refund and then click OK, the Issue a Refund window opens. Everything should be filled out here, though you can add a Memo if you’d like. You’ll also need to make sure the correct payment method is selected in the Issue this refund via the field in the upper right. If you chose Check, be sure to select the correct account and click the box in front of To be printed at the bottom of the window. The next time you print checks (File | Print Forms | Checks), your check should be listed. If you choose a credit card, you should enter a checkmark in front of Process credit card refund when saving.
Tip: Would you like to start accepting credit cards from customers? You’re likely to get paid faster. Contact us, and we’ll walk you through it.
Apply it to an existing invoice
The Apply to an invoice option is probably the easiest if the customer has outstanding invoices equal to or greater than the credit memo. When you select that and click Save and Close, a window opens containing invoices that still need payment. The Original Amt. (the amount of the credit) appears in the upper right. Put a check in front of the invoice(s) where you want the credit applied, and you’ll see how the payment reduces the Amt. Due. Click Done.
Dealing with overpayments
Sometimes you have to issue a refund because customers have overpaid, such as when they’re catching up on multiple invoices. Open the Customers menu and select Receive Payments (or click Receive Payments on the homepage). Choose the customer and enter the Payment Amount and payment method. QuickBooks will put a checkmark in front of the invoices being paid.
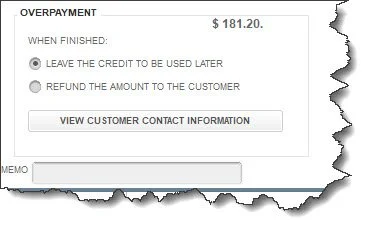
Look in the lower left corner. The overpayment amount is in the Overpayment box, as pictured above. You can choose to leave the credit to be used later or offer a refund. If you choose the latter, the Issue a Refund window will open for processing.
Make your return policy clear
As we mentioned, your company should have a refund policy that spells out exactly what returns will be accepted. When you create one, send it as a separate email to new and existing customers and prominently display it on your website to avoid uncomfortable interactions.
Credit memos and refunds are not difficult to process, but you may have questions when, for example, you have to refund a credit card transaction. Let us help when this happens so you don’t lose money or short-change a customer. As always, we’re here to answer any other questions about QuickBooks.
FAQ
What is a credit memo in QuickBooks Online?
A credit memo is a document that reduces the amount a customer owes, usually issued for overpayments, returns, or billing adjustments.
How do I create a credit memo in QuickBooks Online?
In QuickBooks Online, go to + New → Credit Memo, select the customer, enter the details, and save. This creates a credit balance you can apply to future invoices.
How do I issue a refund from a credit memo
After creating the credit memo, you can issue a refund by selecting Refund and choosing the payment method to return funds to the customer.
Can I apply a credit memo to multiple invoices?
Yes. You can apply a credit memo to one or more existing invoices for the same customer until the credit is fully used.
Do refunds affect my accounts receivable?
Refunds applied through credit memos reduce accounts receivable and adjust the customer’s balance appropriately in QuickBooks Online.